Loading the model
Tip:
Before following the steps in this section, remember to download a model and put it in the models folder in your text-generation-webui installation directory.
Preparing the program
-
Launch the webui by running the start_windows.bat script in your main installation directory. If you're using a different operating system, run the corresponding file.
-
Using your web browser, go to the URL provided in the text-generation-webui console window.

-
From the main application menu, go to the Model tab in the menu bar at the top of your screen.

This is the main interface for selecting and configuring the loading parameters of your model:
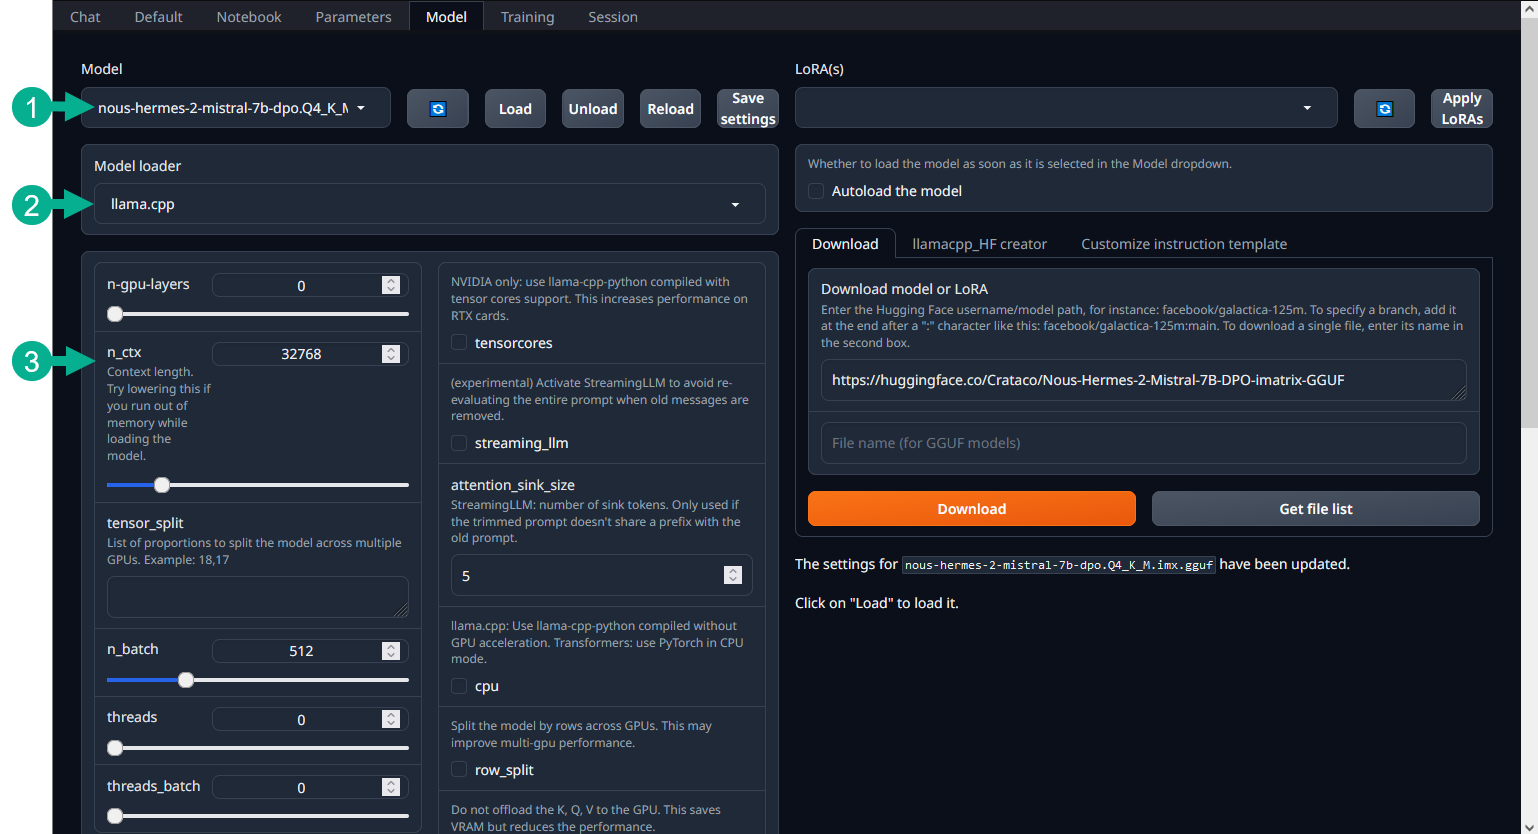
- Model selection dropdown – use this to select the model you wish to load. Use the buttons next to it to load and unload the model, and save your settings for later. The refresh button refreshes the list of models available - useful if you download a new model while text-generation-webui is already running.
- Model loader selection dropdown – while text-generation-webui chooses the best model loader for your model automatically, advanced users might wish to pick a different loader.
- Loader settings – loader-dependent settings for your selected model.
Loading the model
The first step is to select your downloaded model from the dropdown at the top of the screen. Don't load it just yet. First, take a look at the settings below.
If you're following the guide and are using the GGUF format of models, text-generation-webui will choose the llama.cpp loader for you automatically. Before loading the model, you will need to configure the loader settings section:
-
Decide on the context length for your model. This determines how many tokens the AI will be able to remember from your chat. For reference, assume that a token equals about 4 characters. If you're using the GGUF format, this will be set automatically for you. Otherwise, you should be able to find the maximum context length of your model in the model's card on huggingface.co. You can use a smaller context size if you encounter issues with running out of memory while loading the model.
-
Move on to n-gpu-layers. This option determines how many "layers" of the model will be delegated to VRAM, or your graphics card. If you're loading a model purely in RAM, disregard this option. Otherwise, set it to 50 initially. You will come back to this option after loading the model for the first time.
-
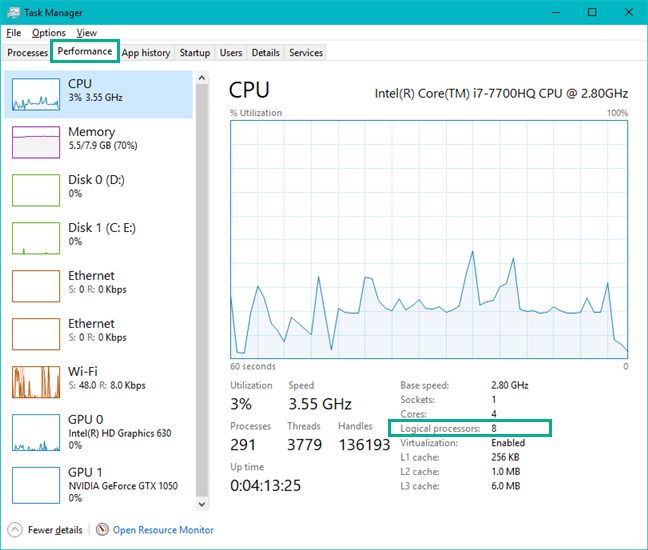
Finally, find the threads option. Set this to the number of threads your CPU has.
If you're not sure how many threads your CPU has available, follow these steps:
- Open the Start menu
- Search for Task Manager and launch it
- Go to Performance, then select your CPU
- Note the number located in the bottom right corner, under Logical processors. That number represents the number of threads you have available.
The other options can be helpful as well, but are dedicated to advanced users. If you're using an Nvidia RTX card, you can safely check the tensorcores checkbox for some extra performance. Otherwise, you are fine to leave the other options as they are.
Caution!
At this point when first loading a model, it is entirely possible that your computer might crash. If it happens, don't panic. You won't cause any damage to your system. Simply wait for it to restart.
A crash at this point would simply mean that you've accidentally overfilled the available memory in your system. Select a smaller model and try again.
Whenever ready, select the Load button. Open the console window and look through the output. If everything goes well, you should see several important messages:
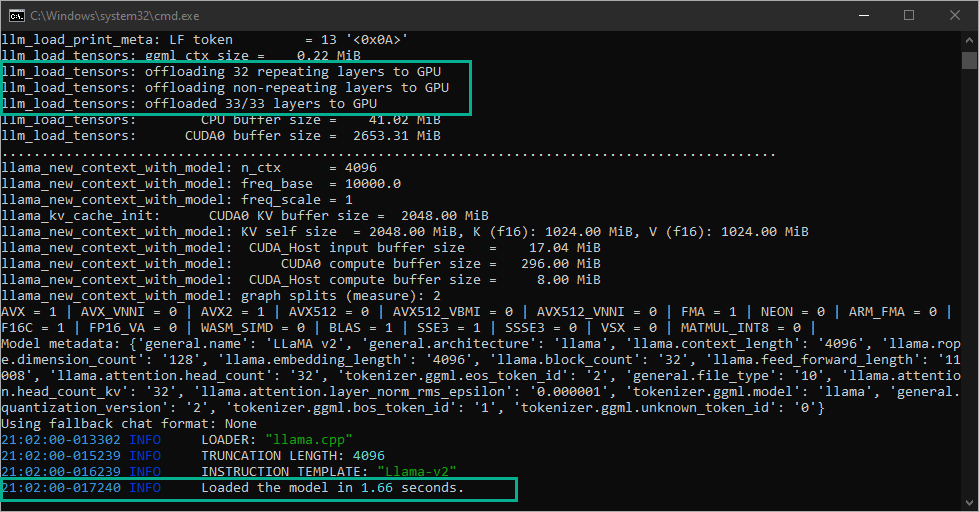
At the very bottom of the terminal output, you will see that the model was successfully loaded.
If you're loading the model in RAM only, then you're good to go. Feel free to skip the rest of this topic and move on to the next step.
If using VRAM or both VRAM+RAM to load a model, you will need to do one extra step.
-
In the terminal output, find the line that says "offloaded xx/yy layers to GPU". This is relevant to the n-gpu-layers option from before. Take note of this number.
-
Open Task Manager and go to the Performance tab.
-
Open the GPU tab.
-
Note your dedicated GPU memory usage. If it hasn't reached 100%, that means the model fits neatly in your VRAM, and you don't need to change any options. If it has reached 100%, you will need to lower the n-gpu-layers setting. Aim for a number slightly smaller than the number of layers you've noticed in the terminal output. Reload the model and try again until your GPU isn't overfilled anymore. Alternatively, try using a smaller model.
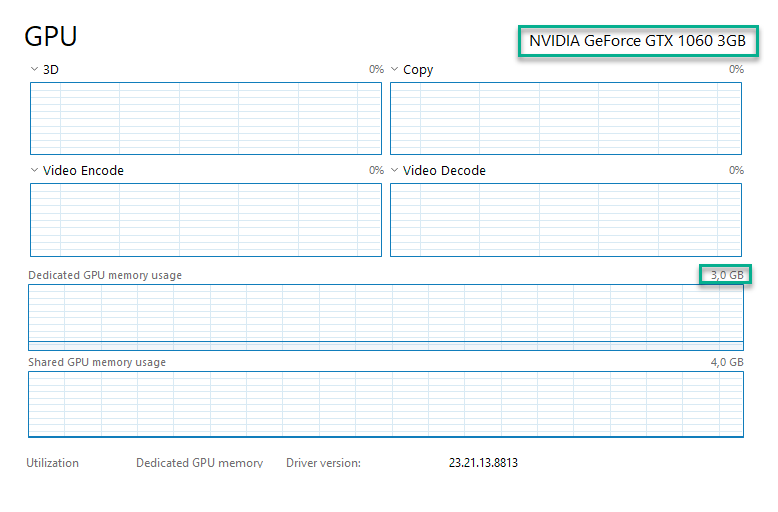
If you're not sure how much VRAM you have available, follow these steps:
- Open the Start menu
- Search for Task Manager and launch it
- Go to Performance, then select your dedicated GPU - it will be either GPU0 or GPU1
- Note the number located in the top right corner of the Dedicated GPU memory usage box. That number represents the amount of VRAM you have available.